For starters, when I cast on for a center out moebius I use my longest cables. I believe the are 60". I use this for all my center out moebius knits. It's the most comfortable length for me. I also like to put a small tip on the end that i will be knitting off. this makes it easier to get the stitches off the cable.
When it comes to cowls, the moebius is my preferred shape as it lies flat and you don't have any bunching at the twist.
This is regarding the center out moebius knit in the round. You can adapt any stitch pattern that looks good on both sides to a moebius knit! It doesn't even have to be the same on both sides, just has to look good.
I always use Cat's moebius co. YouTube link It's a brilliant and super fast co. But its also incredibly sloppy and somewhat difficult to count as you don't have any actual stitches on the needles until you knit 1/2 way around on round 1. Before that it's just yarn wrapped around the needles and cord.
When casting on you count the stitches being wrapped around the needle only. Each set of wraps creates a wrap on top and on the bottom cord, but only count the top!
If you are converting a regular circular cowl to a moebius, co the same amount the pattern recommends (counting top only).
When converting a nesting pattern like chevrons or drop stitch (as in the cowl I'll be posting) or a staggered pattern. You want to cast on in what ever your pattern stitch repeat is + 1/2 that. If your stitch repeat is 8, for example, you want to cast on in multiples of 8+4. The 1/2 count will let the pattern nest above and below the co line. Your grand total, on a 8 stitch repeat will be a multiple of 16+8 counting all stitches (top and bottom). Here is the cast on of the Moebius waves of Color cowl with 1/2 the stitch repeat added so that it nests (I did a few modifications to the original as well which I detailed on my Ravelry project page).

Now I have yet to cast on a center out moebius and have an accurate stitch count. It could be because its such a fast co that my hands work faster than my brain.
So after I cast on and when I'm working the 1st round, I place markers for counting. Of course ALWAYS use something to mark the start of the round! I place small markers every 20 or so stitches. If you need to adjust your stitch count, make sure to balance it on both sides of the co line! This is extremely important on nesting designs!
If you find you need to add stitches, do it in sets. If you need to add 2 stitches do a M1 and in that same spot on the other side use a locking marker and place it between the stitches on the other side so you know you need to m1 in that spot when you get there. A strand of scrap yarn tied around the spot works to.
If you have to many stitches, decrease in sets as well. K2tog and place a locking marker through 2 stitches on the other side so you know to knit them together when you get there.
You need to increase/decrease in this way for fixing stitch counts to maintain the same amount of stitches above as below to keep things lined up properly when you start your pattern.
Working a moebius flat and seaming into shape
Another cowl I made uses a 20 stitch repeat of 10x10 ribbing. When doing something like this you want a reversible pattern and offset design. When working the cowl, I work it flat like a scarf and seam it on the short ends into a moebius. In ribbing you want your rows to end opposite of how they start. Start with knits, end with purls. When you add the 1/2 twist the sides will line up.
You will also want to make sure any row repeats line up properly. The bubble cowl I made started with a bubble on the 1st column repeat. So I needed to end with a bubble being in the 1st column again so that when the twist was made it lined up properly on the other side. If you have a ribbing pattern and knits are on the left, you want to end with purls on the right so it lines up when grafted.
Also, this type of cowl requires grafting in pattern which isn't nearly as complicated as it sounds. I have a post describing how to Kitchener in pattern which will enable you to Kitchener any combinations of knits and purls. It will also help you to understand what you are doing and to tell where you are at if you have to set it down.
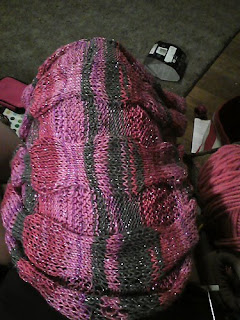
This is the seam of my recent pattern Bubble Moebius cowl.
The seam is the last grey row to the right of the skinny grey strip on the left. On the right you see it flat as a WIP. If you look you will notice that the bubble on the left is knit and the bubble on the right is purl. this needs to be offset like this to be able to make the 1/2 twist required to complete the moebius shape.

No comments:
Post a Comment